FlatList là một thành phần quan trọng trong React Native giúp hiển thị danh sách dữ liệu trong ứng dụng. Nó cung cấp khả năng cuộn mượt và hiệu suất cao, đặc biệt khi làm việc với danh sách dữ liệu lớn. Trên thực tế, FlatList đã trở thành một phần không thể thiếu của hầu hết các ứng dụng React Native.
Để sử dụng FlatList, chúng ta cần import thành phần từ thư viện ‘react-native’, như sau:
import { FlatList,Image, View,} from “react-native”;
Sau đó, chúng ta có thể sử dụng FlatList để hiển thị danh sách dữ liệu. Dưới đây là một danh sách dữ liệu:
|
import { FlatList,Image, View,} from “react-native”; import React, { useState } from “react”; const [DATA, setDATA] = useState([ { image: “//kynguyenlamdep.com/wp-content/uploads/2022/06/anh-gai-xinh-cuc-dep.jpg”, name: “trần bùi thu”, address: “hà nội”, numberPhone: “0985758485”, }, { image: “//www.dungplus.com/wp-content/uploads/2019/12/girl-xinh-600×600.jpg”, name: “trần bùi đông”, address: “hà đông”, numberPhone: “0937475843”, }, { image: “//antimatter.vn/wp-content/uploads/2022/10/hinh-anh-gai-xinh-de-thuong-457×600.jpg”, name: “trần bùi xuân”, address: “hà tây”, numberPhone: “0384583845”, }, { image: “//luv.vn/wp-content/uploads/2021/08/hinh-anh-gai-xinh-71.jpg”, name: “trần bùi hạ”, address: “hà nam”, numberPhone: “09875748374”, }, ]); <FlatList data={DATA} renderItem={({ item, index }) => ( <View style={styles.layoutitem}> <Image source={{ uri: item.image }} style={styles.styleImage} ></Image> <View style={styles.styleContend}> <Text>{item.name}</Text> <Text>{item.address}</Text> <Text>{item.numberPhone}</Text> </View> <Pressable onPress={() => console.log(“delete”)}> <Image source={{ uri: “//icons.veryicon.com/png/o/commerce-shopping/read/delete-181.png”, }} style={styles.styleImgDelete} /> </Pressable> <TouchableOpacity onPress={() => { setModalVisible(true); setIndex(index); console.log(“Edit”); }} > <Image source={{ uri: “//icons-for – free.com/iconfiles/png/512/edit+pencile+write+icon1320166581781211971.png”, }} style={styles.styleImgDelete} /> </TouchableOpacity> </View> )} keyExtractor={(item) => item.numberPhone} ></FlatList> |
Khi run ứng dụng bạn sẽ có kết quả như sau:

Trong thành phần App, chúng ta sử dụng FlatList và truyền vào các props chính:
- Data: là mảng dữ liệu chúng ta muốn hiển thị.
- RenderItem: là hàm sẽ được gọi để render từng phần tử trong danh sách.
- KeyExtractor: là hàm để xác định khóa duy nhất cho từng phần tử trong danh sách.
Trong ví dụ trên, chúng ta đã thêm một phần tử TouchableOpacity xung quanh nút Xóa và Edit để bắt sự kiện Onclick. Vì bản thân thành phần Image không có sự kiện Onpress()
Khi click vào nút Xóa hoặc Edit thì chúng ta cần bắt được vị trí index mà mình vừa click. Vì vậy chúng ta cần tạo ra 1 useState index để chứa index mình vừa click vào.
const [index, setIndex] = useState(0);
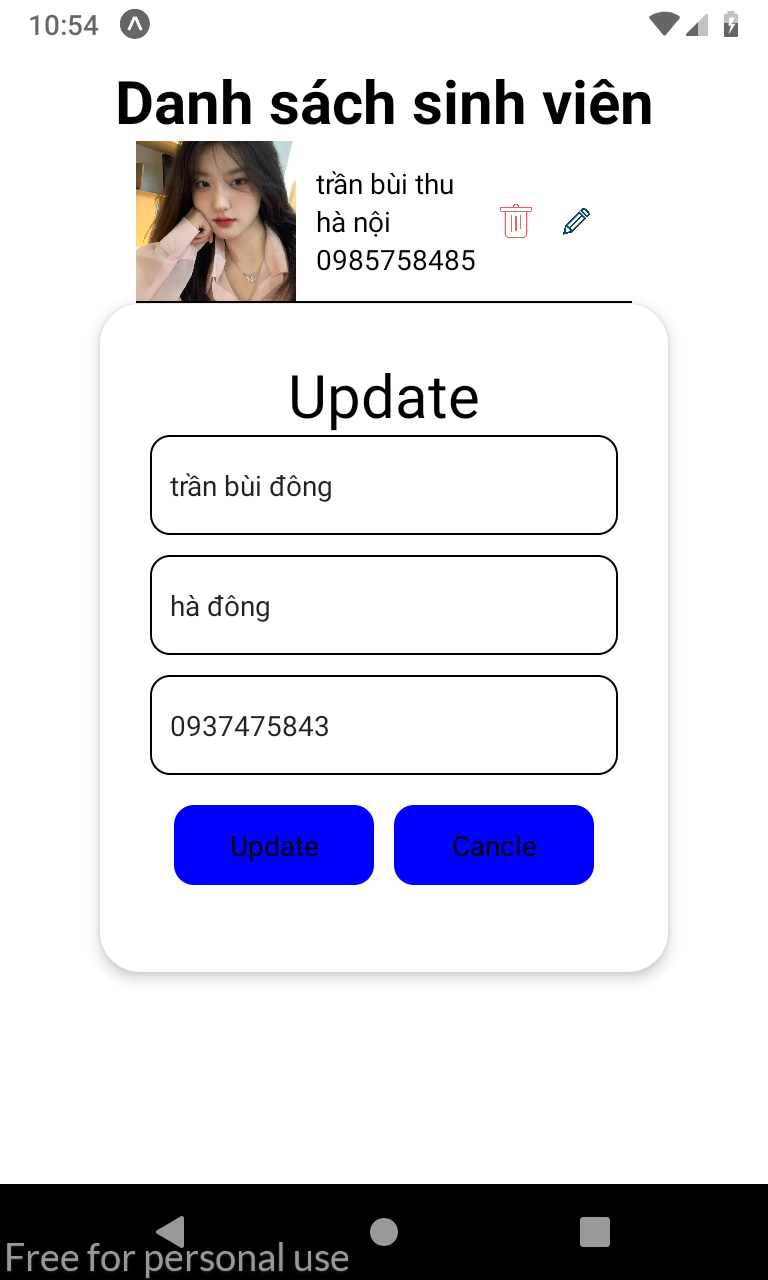
Khi click và Edit thì chúng ta sẽ hiển thị lên một Dialog và lấy thông tin của Item vừa click hiển thị lên Dialog đó. Chúng ta sẽ sử dụng thành phần Modal để tạo Dialog. Tạo ra 1 useState để kiểm soát trạng thái ẩn hiện của Dialog.
|
const [modalVisible, setModalVisible] = useState(false); Đưa thành phần Modal này vào trong thành phần View bao ngoài cùng. <Modal animationType=“slide” transparent={true} visible={modalVisible}> <View style={styles.centeredView}> <View style={styles.modalView}> <Text style={{ alignSelf: “center”, fontSize: 30 }}>Update</Text> <TextInput style={styles.styleInputtext} value={DATA[index].name} ></TextInput> <TextInput style={styles.styleInputtext} value={DATA[index].address} ></TextInput> <TextInput style={styles.styleInputtext} value={DATA[index].numberPhone} ></TextInput> <View style={{ flexDirection: “row”, justifyContent: “center” }}> <Pressable style={styles.styleButton}> <Text>Update</Text> </Pressable> <Pressable style={styles.styleButton} onPress={() => setModalVisible(false)} > <Text>Cancle</Text> </Pressable> </View> </View> </View> </Modal> |
Đây là toàn bộ Style cho ứng dụng. Các bạn chỉ cần copy và đặt vào phần Style:
|
const styles = StyleSheet.create({ container: { flex: 1, alignItems: “center”, }, layoutitem: { flexDirection: “row”, marginBottom: 10, borderBottomWidth: 1, alignItems: “center”, }, styleImage: { width: 80, height: 80, marginRight: 10, }, styleImgDelete: { width: 20, height: 20, marginRight: 10, }, styleContend: { flexDirection: “column”, marginRight: 10, }, centeredView: { flex: 1, justifyContent: “center”, alignItems: “center”, marginTop: 22, }, modalView: { margin: 20, backgroundColor: “white”, borderRadius: 20, padding: 25, width: Dimensions.get(“window”).width – 100, height: Dimensions.get(“window”).width – 50, shadowColor: “#000”, shadowOffset: { width: 0, height: 2, }, shadowOpacity: 0.25, shadowRadius: 4, elevation: 5, }, styleInputtext: { borderWidth: 1, height: 50, marginBottom: 10, borderRadius: 10, paddingLeft: 10, }, styleButton: { backgroundColor: “blue”, width: 100, height: 40, borderRadius: 10, justifyContent: “center”, alignItems: “center”, margin: 5, }, }); |
Kết quả khi xây dựng Dialog sử dụng Modal:
Ngoài ra, cụ thể về cách xóa và edit mảng dữ liệu data thì các bạn xem lại kiến thức xóa và sửa dữ liệu trong mảng javascript.
Trên đây là cách ưng dụng FlatList trong ReactNative giúpvieejc lập trình mobile trở nên dễ dàng hơn bao giờ hết! Chúc các bạn thành công!
Bộ môn Công nghệ thông tin
Trường Cao đẳng FPT Mạng cá cược bóng đá
cơ sở Hà Nội


